With the incredible rainfall we've had here in the east, there's been ample opportunity for fungal diseases in the garden. The late blight epidemic, affecting tomato and potato crops, is an example, although blight is not technically a fungus it responds to the same cool wet conditions. Fortunately, we have no signs of blight in our nightshade crops this year, which led me to ask the question why? What did we do right? In asking this question, I also did some research on a few new (to me) fungal diseases, and what led to their introduction into our garden.
As far as late blight is concerned, I believe the two most important measures of prevention were quality, uninfected seed, and rotation. I've saved my own tomato seed for three generations, and each year I follow the method of fermenting the seed pulp before washing the seed and properly drying it for storage. The
fermentation process promotes good germination, but it also destroys potential pathogens that can be harbored by the seed. Our potato seeds are put to the test by coming through a long storage period, proving that they are disease free.
Second to quality seed in disease prevention, is rotation. It is best to maintain a 2-3 year rotation of crops, and whenever you are introduced to a new disease in your garden, it is important to research the alternate hosts of this disease. It can be surprising to find dissimilar crops can host the same disease, and often weeds will harbor and spread disease. Along with rotation, it is necessary to remove any plant residue (leaves, stems, roots) from the garden and properly compost the material before returning it to the soil.
These two important factors certainly contributed to our garden's blight free status, despite the prevalence of blighted potato fields no more than 5 miles from us. Healthy plants will be able to withstand certain thresholds of disease, borne in on the wind and rain, so part of the story is plain good fortune that our crops did not succumb. But keeping the plants from contact with the soil can also prevent or suppress blight. So perhaps the layer of mulch we applied to the crops in mid-June hampered the incubation process, necessary to the spread of the disease.
I always thought of carrots as a rather trouble free crop, once they are thinned and weeded, they generally take care of themselves. We've had some damage from Carrot Root Fly (or Carrot Rust Fly), but again, rotation and fall cultivation is usually enough to keep their numbers under control. This year I have been introduced to a fungal disease that affects the carrot leaves, Alternaria Leaf Blight. It affects older crops, later in the season after the rows have closed in, reducing air flow. Like other fungi, it thrives in cool wet conditions. But where did it come from, how was it introduced to our garden?
Going back to my original statement, about the importance of quality seed, I realized that my first carrot seed saving venture was flawed. I had selected quality storage carrots to grow for seed last summer, but I had not read enough information about preventing the spread of disease through seed. Alternaria is most often transmitted through infected seed. And there is a simple method of treating seed to halt it's spread to the next crop. Many types of seeds, including the Cole family, lettuce, spinach, eggplant and nightshades, as well as carrots, can be treated in a hot water bath, for a specific length of time (see the
table on this link for details). I have also read about using a hot water and cider vinegar solution, though it looks as though the temperature and length of exposure is the most effective measure of killing potential pathogens.
The Alternaria leaf blight does not much damage the crop, especially at the later stages when most of the growth is complete. For the most part, it is a problem for mechanical harvesters, as the stems break off easily, leaving roots in the ground. The most damaging effect of this fungus is that is promotes the spread of damping-off in the soil. And I do believe that my last planting of carrots was cut back by damping-off. This could lead to potential problems for direct seeded crops and young seedlings in the future.
 Alternaria Leaf Blight of Carrots
Cereal crops have their own biosphere of diseases, including fungi, bacteria and viruses. Most of these disease cycles can be broken by planting non-cereal crops in rotation, but some vegetable and legume crops can host cereal diseases as well. Developing resistant seed in cereal crops is an important and active area of agricultural research. Research labs around the world are constantly responding to new mutations of cereal diseases, breeding crops with genetic resistance, and making these resistant varieties available to many Third World countries whose farmers do not depend on fungicides for healthy crops.
We bought our Vicar Hulless Oat seed from a small independent seed producer, the seed is an heirloom variety, and granted, there are few options for purchasing small quantities of cereal seeds in Canada, so we hoped for the best. The description of the seed said nothing of disease resistance, and in the future, that will be a requirement in my seed purchases. Our Hard Red Spring Wheat is a modern, disease-resistant cultivar, proven in our climate, and it has withstood the variety of cereal diseases this year. The Hulless Oats, on the other hand, are peppered with Septoria or Speckled Leaf Blotch, a fungal disease. It can easily spread to other cereal crops, so our healthy crop of wheat, only 20 feet from the infected oats, has given me first-hand evidence of the necessity of disease resistant cultivars.
 Septoria or Speckled Leaf Blotch on Hulless Oats
 I found this to be a method comparable to the boiling process, perhaps a bit slower, but no standing at a hot stove, waiting over a steaming pot for the water to re-boil. I certainly enjoyed the task more, and felt less worn out afterward. And sometimes that's more important than the length of time a task takes.


 We've got whopping big potatoes this year, must be all the rain. And even this pound-and-a-halfer had barely a spot of hollow heart in the middle, solid potato all the way through, and enough to fill the dinner plate!
 We're expecting a real Zero degree frost tonight, so the squash and pumpkins have been brought in to cure. We had a late crop, and there were a dozen or so of these little promising would-be squash. Not sure how much flavor they have, or how green they are, at best I'm hoping for something like zucchini. I figure I'll try them breaded and fried, after all, everything tastes good breaded and fried! If not, I'm sure the goats and chickens will make quick work of them.
 We put our peppers, tomatoes and ground cherries in one long bed so that we can cover them easily. We procured some heavy plastic house-wrap from a mini-house mover. He usually has to pay to take it to the dump, so he's always keen to pass it along. It is very heavy duty plastic, we have also used it as the weather-proof layer to our board and baton barn roofs, and it has out-performed anything we have purchased. At least it's diverted from the waste-stream, it's hard to believe that plastic this heavy, with so much potential for re-use, is trashed after a single use.
 The sunflowers have indeed bloomed in time to make seeds, I always forget how frost hardy they are. We are going to experiment with de-hulling the seeds this fall/winter.
 The
The  A late summer fruit,
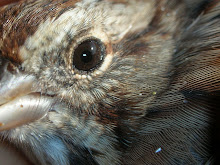
  Of course, the local songbird population is also fond of these sweet fruits. This female Common Yellowthroat, of the wood warbler family, foraged in the same bush.
 I got this lucky shot some time later.
 I try to keep a profusion of late summer and fall flowers available for the insects. These flowering lettuce bushes would normally be a part of my seed saving regime, but we are going to start over with regionally appropriate seed varieties in our next garden, somewhere on the West coast, so these flowers are just for the bees. The last pollen producing flowers in the garden are the hardy broccoli flowers, I always leave the small side shoots to go to flower, they continue to bloom and attract bumble bees even after the ground starts to freeze, well into November, even early December.
 A fennel flower, on it's way to seed, I hope. I started these fennel plants in March this year, determined to get some fennel seed from these slow-pokes, we'll see.

 We experimented with a few hand harvesting techniques last year, and have come to settle on crude but effective, inexpensive kitchen knives as tools. Gathering a handful of stems, we cut the stalks near the heads, therefore bringing very little stalk into the storage bin. This reduces the amount of space needed to store the heads until we can thresh it all, and it also makes the
  But for now, we find this simple and steady pace is not too arduous or time-consuming to make hand harvesting our wheat possible. Side by side, we can cover 2000 sq ft an hour, so we can bring in our 1/6th acre in six hours of work, spread out over 3-4 days. We fill large feed bags lashed to our sides, large enough so that the bottom of the bag rests on the ground, and no weight is placed on our backs. And we empty these bags into a prepared grain bin, 8' x 4' x 4'. This way, we can thresh the grains in November and December when the rest of the harvest and winter preparation has slowed down.
 And the quiet, meditative pace of the work allows us to share conversation and song, and the bond of working side by side. The greatest pleasure of harvesting by hand, rather than machine, is being able to witness the buzzing, hopping life in the midst of a sea of grain. These fire-engine dragonflies were mating on the bobbing heads, sparrows and wood warblers glean insects and seeds on the ground, grasshoppers catapult away from our sweeping hands, and the sky is abuzz with late summer song.
 Our cultivated grains are not the only ones ripening. While thinking about the process our ancestors went through to begin sowing and selecting wild grains for their potential food value, my eyes began to scan for the ancient wild strains of our cultivated grains. In our garden we have these foxtail grasses, ancestor to a still cultivated foxtail millet from Asia.
 As well as barnyard grass, ancestor to the proso millet we are growing. Both of these millet ancestors had been attracting small sparrows to the feast.
 This flowering seedhead of bindweed is ancestor to buckwheat, domesticated in southeast Asia 8000 years ago.
 And this lamb's quarters seed head is close cousins with, and ancestor to quinoa, a valuable and important high-protein staple of the Inca who called it "mother of all the grains". Because of it's ceremonial use, Chrisianizing colonists forced the South American Indians to abandon this quality food for the less nutritious and water hungry corn.
 Our own proso millet was ready for harvest as well. The fan-like seed heads ripen gradually, from the top down. It is ready to harvest when the tops are ripe and the bottom grains have lost most of their green. Commercially, the crop is swathed and left to ripen in the field like hay. But it is often plagued by birds and rodents while ripening, and there was some competition for my crop as well. So I cut the heads and let them cure in the house, in a dry warm spot for a week or so.
 The hulless oats, originally domesticated relatively late in the Fertile Crescent beginning 3000BC, were likewise, mostly cured, but with a few remaining green-tinged heads. Since it is a small crop, and many of the head were beginning to lodge (or fall over on the ground), and the birds were beginning to pay it some attention, I harvested a week early and finished curing it indoors. The oats are easy to strip off the stalk, and with a small crop, it can be done quickly and efficiently.


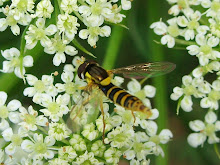
 Syriphid Fly eating the nectar of a Calendula Flower.
 Northern Leopard Frog, Rana Pipiens, this wet and soggy summer has been great for the frogs, never seen so many frogs and toads in the garden. Even found a young Wood Frog in the Zucchini. Plenty of bugs and slugs for them to eat this year.
 Syriphid Fly tasting a Red Clover blossom. It's a great year for these Syriphid Flies too, there's dozens in the garden, the larva are predatious, often of aphids and other small soft bodied insects, but the adults are pure nectar eaters. And red clover is one sweet source of nectar. I use it as a natural sweetener in herbal teas.


 The cutworms preferred the amaranth, quinoa and poppies over the cereals like oats, millet or popcorn, so they may deserve some
  Golden Amaranth. The grains seeds are the size of sesame seeds with a high protein content of 16%. I am also testing each of these grains as possible feed grains for livestock, so the high protein grains are attractive. Amaranth greens can be eaten as a cooked vegetable when young, so plant thick, and thin the plants out to about 2' spacing (livestock will love the thinnings as well). This variety can reach 6-8' high. The seeds are good cooked in porridge, added to granola, added to breads or baked goods, and can be popped as a snack, or sprouted.
 Red Quinoa. At least 16% protein, and a whole protein at that, with all of the amino acids our body requires. It can be tricky to grow, seems to be more susceptible to drought, rust and aphids, and does not have the hardy characteristics of it's cousin Lamb's Quarters, which seems to thrive just about anywhere. It is also a longer season grain, and light frost will burn and kill seedheads.
 Vicar Hulless Oats. Easy to grow and thresh for use in the kitchen. Similar growing requirements to regular feed type oats. We chose a heirloom variety, but it is not showing high resistance to rust, so in the future we would choose a more resistant modern variety. Only a few plants are as blighted as these ones, most of the crop will mature despite the rusted leaves, but it is not good practice to allow rust to develop in our garden as it will jeopardize our wheat crop. If we were staying for another season, we would most likely have pulled up all of the rusted plants and removed them from the garden.
.JPG) But they do need protection from the European Corn Borer. I would like to try putting mesh bags over each ear, in the early stages of development, to prevent the maggot from damaging the kernels. Left as they are, with the biological controls of natural predators, they take about 10% of my crop.
But they do need protection from the European Corn Borer. I would like to try putting mesh bags over each ear, in the early stages of development, to prevent the maggot from damaging the kernels. Left as they are, with the biological controls of natural predators, they take about 10% of my crop.
.JPG) The Pea Moth is the main pest of our pea crops, but they seem to prefer the higher sugar content of the shelling peas, and generally leave the dry peas alone. The dry peas are also more resistant to mildews, because they seem to mature and dry out before the long-fruiting shelling types.
The Pea Moth is the main pest of our pea crops, but they seem to prefer the higher sugar content of the shelling peas, and generally leave the dry peas alone. The dry peas are also more resistant to mildews, because they seem to mature and dry out before the long-fruiting shelling types. Jacob's Cattle Baking Beans. A decent bush type baking bean. It's not the highest yielding type, but the beans are very good, smooth and flavorful.


.JPG)


