Showing posts with label crafting. Show all posts

10 November 2009

Wool hood and scarf for Winter Biking

I'm inevitably prone to catching the knitting fever this time of year.  It's the crisp temperatures and the adding of layers... what would winter be without wool?  We have wool long-johns, wool sweaters, double-layer wool mittens, and the usual plethora of wool socks, hats and scarves.

But never are these wool garments tested more than when winter biking.  The wool long-johns have proved their worth in stitches, wool sweaters always form one of the 3-4 layers in our full winter biking garb, and nothing could be more important than a pair of wool socks (or two) for fast-pedaling feet.  But there have been gaps in our woolen armor.  Even the double-thick wool mittens only make it to about 0-5 C; stationary hands get quite nippy, wind chill is always a factor on a bicycle, and the cold finds it's way through the stitches.  Ski gloves work best for winter biking.

The other cold spot is the face and neck area.  I have usually tried to cover all the bases with a hat that covers most of the ear, a face scarf that covers ear lobes, face and chin, and a scarf wrapped copiously around the neck.  But there's always a little gap that forms between the hat and the face scarf, exposing tender ears.  Our goal in winter biking is to comfortably transport ourselves, not lose various extremities to frost bite.

Hence the latest woolen duo: hood and face scarf.  The hood fits neatly under a helmet, and generously covers all those little gaps left by too much mis-matched head garb.  The face scarf provides a double covering for the ears and neck, with a single breathable layer over the mouth and nose.  A heavy scarf can sometimes prevent easy breathing, and once you are moving along on a bike, the face is warmed by a cloud of warm breath.  In the event that the face becomes too hot, the face scarf can be slid down to the chin, and easily moved back into place upon cooling off.

We are now looking forward to comfortable journeys on our two wheeled steeds this winter, covered in wool from head to toe.


These two pieces are quite simple to knit.  Find a gauge that works with your favorite worsted weight wool yarn, and calculate your stitches for 16 or 17 inches, depending on the size of your head and whether you want a close or a loose fit.

For the hood, work in the round for 4 inches, in 1x1 ribbing.  BO one inch at the beginning of the next row, then work back and forth in stockinette (or find a more decorative stitch such as cabling, herringbone, etc) for 11 to 12 inches.   Now pick up stitches along the side edge, including half of the bound off stitches in the chin.  Work one side, then the other, in 1x1 ribbing for 1 1/2 inches, BO in pattern.  Sew the seams, beginning with the top of the hood, then the seams on the edging.

Work the face scarf in the same 1x1 ribbing, but add one more inch of stitches per row than the neck of the hood.  Work in the round for 6 or 7 inches.

29 April 2009

The Resourceful Re-purposed Sock


We were offered a spot to Guest Post over at Not Dabbling in Normal today. I re-posted a New and Improved version of making Sweater Socks, experimenting with materials for making great summer socks. Check it out, and be sure to explore the great resources and team of writers over at Not Dabbling.

26 February 2009

Making liquid dish soap

Finally got around to making a batch of soap. It is my second batch, and I am still a bit intimidated by the lye. I was also terrified of my pressure canner the first few times I used it, especially on the wood stove!

This soap used half beef tallow, half lard, and that seems to be a popular combination of fats, for consistency. My first batch was pure lard, and it was a great laundry soap, and dish soap. I like the creamy coloring that the tallow gives this soap. Although I'm not sure it came out so great, there was a bit of separation, it seemed that the two fats did not want to dissolve at the same rate in the lye solution. I kept stirring gently for at least 20 minutes and it only ever got to a lumpy honey consistency, not well blended. And there was a little bit of separation in the mold, like some of the glycerin had separated out. But it will work just great for laundry and dishes regardless. One batch of soap (4.4 lbs fat to one bottle of lye) does us for a year or more.


There were some great soap making tutorials up on blogs in the Fall, thanks especially to Throwback at Trapper Creek. But I haven't seen anything about making dish soap, or jelly soap. Jelly soap is the consistency of a good stock, and it can be mixed with water to use in hand pumps or as a liquid dish soap. I keep all of my bits of soap, too small to use, and I added them to the crumbles left over from cutting the bars of my new batch of soap. The recipe for jelly soap is 1 lb grated soap to 1 gallon water. Boil for 10 minutes.

I water it down, half jelly soap, half water. It does foam up with a bit of agitation, and works great for dishes. Cuts grease and leaves glass sparkling! We need a little jingle playing in the background. I thought it might work great for people using homemade soap in laundry machines. I use the bars with my ol' washboard. But this liquid soap would dissolve well in cold water wash cycles.
The kids are growing fast! The have doubled their size in two weeks, and are just about able to make a vertical leap over a 4 foot gate! Good thing we are planning to tether them in the summer. They have been nibbling on hay, but are just starting to actually eat a bit of it. Penelope is consistently giving 3 Quarts of milk a day, which is great for us, and as soon as the kids are weaned, we will have extra milk to make yogurt and cheese and butter! I did try some of the goats milk in the cream separater, and it worked, so I should be able to make goat butter.

12 January 2009

Hand-Maiden Brassiere


A few years ago I was in town shopping, and stopped at the discount clothing store to replace my worn sports-type bras that I wore for working in the garden, fields or barns. They ware out pretty quickly, and like everything else I purchase new, I am conflicted between keeping within my modest budget, and purchasing socially-responsible goods, which are often, for good reason, more expensive. The simple cotton bras and underwear I was eyeing, and deliberating over, were made in Bangladesh. Immediately I could imagine the young girls and older women, working long days in poor conditions for little pay to make these articles. And then, I could see the fields of Monsanto cotton, being grown all over the Indian countryside as they hit the peak, and subsequent collapse, of their own "green revolution" in chemical farming. These fields not only poison the ground, and destroy the ecology, but also make the poorly-paid cotton pickers ill with skin diseases and cancer. I put the neatly wrapped and innocent-looking packet down.

Having a sewing machine, and knitting needles at my use, I often make certain articles of our clothing, and buy most everything else second-hand. Bras and underwear were pretty much the only things I bought new, but had never thought of making at home. I could see no reason why I shouldn't be able to make these simple articles, and I could easily see that by making them at home, it would help to resolve the issue of purchasing socially and environmentally responsible goods within a limited budget. Everything that we can produce from home, leaves more in the budget to shop responsibly for what we cannot produce, or have not yet challenged ourselves to produce. There are of course "foods" like coffee, black tea, chocolate, cinnamon that will not grow in our latitude without a heated greenhouse, but which can be easily purchased, for a slight premium, fairly-traded, organic, shade-grown and slave-free. Then there are purchases like the pressure canner, grain mill, generator, etc which we cannot easily produce from home, without something like a community workshop, but with enough room in the budget we can at least purchase a high-quality product that will last a life-time (or at least a long-time). This is my motivation to make as many things at home as I possibly can, adding more and more each year as I get comfortable with newly acquired skills. Even if making it myself will only save us $30 a year, something like vinegar or herbal teas, this $30 here and there will make the difference between buying a year's supply of discount brand cocoa powder, which was likely produced with slave labor in the Ivory Coast, or buying slave-free organic cocoa powder. And that makes a real difference.

Besides, the bras and underwear I have made are incomparably more comfortable, more durable, and more beautiful than those I would have bought. The plain cotton ones, overlooking social and environmental issues, make me feel poor when I wear them. My hand-made bras and underwear are luxurious by comparison, and like the good food on our table, adds a richness and quality to our lives.

I have experimented with a few prototypes and designs, I was drawn to knitting the undergarments, and found a few patterns on-line, that I have since modified and adapted to my own design. This last week or two I have finally made two bras, based on a simple design, that I am thrilled with, and will share. I am going to tackle the underwear next, I have knit a few using a cotton yarn, and am almost happy with the result. But I am also trying a few simply made on the sewing machine. I will post those results when I am happy with the design.

These bras are knitted without seams, on straight needles size 4.5cm, US size 7, for the purple one, and 3.5cm, US size 4, for the blue one, as the blue yarn is much thinner. For best results you will need access to a sewing machine, the backing band could be sewn by hand, but it would be more difficult. With a sewing machine you can hold a consistent tension between the stretchable knitted fabric and the woven backing. The most useful way to describe the design, is to give measurements, and allow you to work out the number of stitches based upon the gauge of the yarn and needles you choose. Any basic knitting instructions in a book or on a website would tell you how to find the gauge (stitches per inch), if you are a beginning knitter. Do not be intimidated, it is very simple. Once you have your gauge, multiply the number of stitches per inch by the given measurement. If your gauge is 6 stitches per inch, and the measurement is 6", then knit 36 stitches in a row.

I made the purple one first, with the buttons in front it opens enough to put on over my head, but I recommend the design of the blue one, with button closures in the back. The purple one is knitted in garter stitch, to save the trouble of blocking the finished piece, and because the yarn I chose was lumpy and thick, this is more of a cold-weather bra. It is warmer, and beneath thick tops and sweaters, the lumpy texture is invisible. The blue bra is knitted in stockinette stitch, with a soft thin yarn, and can be worn beneath clingy summer tops.

First measure your ribcage, just below your breasts. If you measure between 28-32 inches, you will be able to follow these directions closely, if you are outside of this range you will have to adjust the measurements accordingly. The final length of the knitted piece will be a few inches short of your ribcage measurement because when you sew on the backing band, you will lightly stretch the knitted fabric to match.

Cast on a number of stitches, in your gauge, that will give you 1 inch. I will give the instructions in stockinette stitch, but you can work it in any stitch you choose, adding a lace pattern or decorative edging. I slip the first stitch of every row to make a neat edge. The measurements given below are when the piece is held loosely, not stretched out. Knit until the piece reaches 4" long (for 28-30 ribcage), 4 1/4" (for 30-32 ribcage). Begin increasing one stitch, every row. Increase only on one edge of the piece so that the other edge remains straight. I increase with a yarn-over between the last two stitches on the RS of the work, and between the first two stitches on the WS of the work, knitting (or purling) into the back of the yarn-over so that it does not leave a hole in the piece. Increase until the piece reaches 5 1/2" wide (calculate the number of stitches in your gauge) for A-cup, 6" for B-cup, 6 1/2" for C-cup and so on. Continue to knit straight for 3". Begin deceasing one stitch every row, again on the same edge as the increases, until the piece reaches 3 1/2" wide (according to your gauge). Knit straight for 1 1/2" (28-30 ribcage), 2" (30-32 ribcage). Begin increase, and work in reverse order for the other cup. When you get back to your original number of stitches for 1", knit straight for 3 1/2" (28-30 ribcage) 3 3/4" (30-32 ribcage), then make two button-holes in a single row, one near the beginning and one near the end of the row. For example, knit 3 stitches, yarn over, knit two together. Knit until 5 stitches remain, knit two together, yarn over, knit 3 stitches. Finish final 1/2", and bind-off. Your finished piece should measure about 3" less than your ribcage measurement.

For the straps, knit I-cord, using 2mm, US size 1, double-pointed needles. You will need only two needles. Leaving a 6" tail, cast on three stitches, do not turn, simply slide the stitches (now on the left end of your right-hand needle) over to the right end of the same needle. Without turning, switch needles so that the stitches are in your left hand. Bring the yarn behind the work and knit into the first stitch, working across the row as usual. Slide and switch needles. Keep working until the cord reaches about 16" when stretched to full length, and bind off. Leave a 6" tail on the end. Make two straps. Attach to the middle of the cup in the front, and 3" from either end in the back. This cord will stretch a bit when it is first worn, and you will want it to be well fitted to your own shoulders since it is not adjustable. So when you attach the straps to the bra, keep track of your bound-off edge, attaching it to the back of the bra loosely, so that you will be able to make a final adjustment.

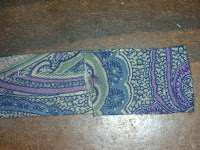
If you have knitted in stockinette, your piece will need to be blocked. When it is dry, sew on the backing band. For the backing band, take your ribcage measurement, and add 1/2" to make room for the button closure. Use any type of non-stretch material, woven fabric is best, a wide ribbon will work as well. If you need to hem the piece, do so now, so that it measures 1" wide, and the length of your ribcage + 1/2". Make wide hems at the ends to allow for the button-holes. I probably did a clumsy button-hole, there are more professional ways to make them I am sure, but I simply cut two small button-sized slits, matching the placement of the button-holes in the knitted piece, sewed around the edge of the holes, and trimmed the loose fringes inside the holes to make it neat. When your backing is ready, start by pinning the two ends in place, careful to match the button-holes. Then take the two ends in one hand, and stretch the knitted bra to meet the backing, and pin it in place in the middle. Then work around, pinning in between until there is one pin placed every 2", and the backing and bra match up. Now begin to sew, using a sewing needle specifically for knits if you have one. You should still have the loose tails of the straps hanging out, make sure not to sew these into the backing. Hold tension along the length of the bra as you sew, turn and sew along the other edge. Fix the buttons in place.

Now try the bra on, and test whether the straps are the right length. Do not leave them too loose, or the straps will slip off your shoulders. Test it by putting your finger under the strap at the top of your shoulder, and if you can easily lift the strap away, then detach the cord from the back, and work back as many rows as will give you the right fit. Make it just a little tighter than you think, and wear the bra for a few hours before you make any final adjustment. When you are satisfied with the fit, tie off your straps with a knot and work all ends in. Take note of any areas you would adjust to create your own custom pattern, for future use. Hand wash in warm water with mild detergent, dry flat.

24 November 2008

Sweater socks: Part 2

Sweaters that make the best socks are XL men's knit, with a tight stitch. Round neck or turtle neck are better than V-neck. I am also experimenting with fleece pull-overs as sock material. In the winter we often wear two layers of socks. The knit wool sock close to the skin would draw moisture, and the fleece sock over top would provide more insulation.

This is an XL men's wool knit, measuring 23 inches across the body. Excuse the poor quality image. This is an ideal sweater to make two pairs of knee-hi socks from the body, and one mid-calf pair from the sleeves. These are simple straight tube socks. Take a calf measurment for your own custom socks, and use that as your starting point. I have found that 11" works great for both of us. I would call that a medium.

The red yarn in this blurry picture *oops* marks out where I will cut. The best and most straignt forward sock comes from the middle 11" strip. Front and back will match up as one pair. The side cuts are a little funny because of the armholes. Measuring just above the waistband, I cut these at 6" from the seam, both front and back, leaving the seam in place. I make these "flank" cuts a little wider to compensate for the narrowing along the armhole. Starting at the waist band, cut straight up to the shoulder seam, cut along the shoulder seam, and down along the inside of the armhole seam. Do this front and back. Cut off the neck band. You should have something like this. A pair of flank socks.

An easy pair of tube socks.
And a pair of sleeve socks.

Remember that the waist band and wrist bands of the sweater are going to be the calf bands on the sock, and the shoulders are going to be the toes. If you are dealing with a V-neck, then your middle socks will be shorter, either mid-calf or ankle length depending on the sweater. Cut the back strip to match the front.

Now that you have your sock material cut, fold them inside out, and start sewing the seam from the calf band, down to the toe. Start with the strips from the middle of the sweater, they are the easiest pair. I make a narrow seam, only 1/4", so that the seam is not bulky. A bulky seam could be uncomfortable in the toes of tight fitting shoes. I sew the seam twice over, with a tight stitch to prevent the seam from pulling out.

Round the toe, then try the sock on, inside out, to see if it fits. You may want to make the ankles narrower if they sag, or you may find that the calf needs to be tighter. You can always make them tighter, until you get your own measurments worked out.

When you are happy with your first pair, tackle the funky armhole socks. For this pair, remember that I had cut them at 6" from either side of the seam, because the sweater was wide enough. So I started my seam at the calf, a 1/2" from the edge to maintain an 11" calf measurment. When I got to where the armhole narrows, I returned to a 1/4" seam following the contour of the fabric, rounded the toe, and continued around back to the body seam. I tried the sock on, and found that the ankle was baggy, and took it in until I was happy with the fit.

Now for the sleeves, they usually taper down to the wrist. The wrist band will usually fit nicely just below the calf. Make a mark where the sleeve gets wider than your basic width measurment (that's 5 1/2" for me or half of 11"). If you look back to the sleeve picture, the tape measure marks out where the sleeve reaches 5 1/2" wide, and the red yarn marks out where I will make my seam. Start the seam at your marker, and round out your toe as usual. Try it on before you cut the material, depending on the sweater you may need to make an adjustment.

When you are pleased with the fit, trim off the excess fabric, turn the sock right side out, and try it on again. The seam at the toe and running along either side of the calf has never bothered me.


Narrower sweaters may not allow room for three pairs. In that case I would take the middle strip from front and back to make one pair, and the sleeves to make one other pair. Women's and children's sweaters will make great short summer socks or kid's winter socks. Don't throw out those turtlenecks either, they make great neck warmers, especially for doing barnwork where a dangling scarf might get in the way. I have tried making gloves out of sweater fabric as well. Experiment and have fun!

18 November 2008

Some of the little things

We do the best we can to live according to our conscience, here on our homestead. And living within limited means dictates some of our less-than-ideal choices. We are always making choices, and usually making small sacrifices, to find a way to live conscientiously: to responsibly manage our time, our physical and mental energy, the natural resources on our homestead and in our community, and of course, our limited cashflow. We set priorities for the necessities, and make long term plans to meet wider goals. Most everything our society takes for granted is largely destructive at it's root: our electric grid, food system, transportation, and production/consumption cycle. We have made those large lifestyle changes to address the bulwark of our concerns, reducing our power consumption to a level we could affordably produce with renewable energy, growing most of our food, living car-free out in the country by sharing rides and organizing monthly town trips, and for the rest either going without or buying responsibly.

For most things, we prefer to buy second hand, for small appliances often times older models have higher quality manufacturing. I picked up this table top sewing machine for $5, in great condition. All of our clothes are second hand, there's just too much used clothing out there, in perfect condition, and with a sewing machine just about anything can be made to fit. I also love to knit, and am a novice spinner, so our hats, gloves, scarves, and even undergarments, are homemade. And will one day, be made from homegrown fiber.
But I don't knit socks anymore. It's not that I don't like to, it is just that they ware out too fast for the amount of time I put into knitting them, and the cost of the wool. A hand-knit pair of socks costs $3 and about 3 hours, and usually only last a month. But store bought socks, or the pitiful collection of thin cotton socks in the second hand bin, just don't cut it for our winters. And my dear husband certainly deserves good winter socks, he is the one usually doing any unpleasant work outside in cold weather, while I am inside the warm house baking and well, knitting. So I would knit socks regardless, if we hadn't come up with an acceptable alternative.

Our local second hand clothing shop has an under-utilized abundant resource of out-of-fashion wool ski sweaters. These sweaters are tightly knit and make a very durable and warm fabric, perfect for socks. One large man's sweater will make about three pairs of knee-high socks, costing maybe 25 cents and 10 minutes a pair, and lasting about six months. Use the waist and wrist edges as the top of the sock, depending on the particular sweater, either cut out two strips between 5-6 inches wide, the full length of the sweater, or one 10-12 inch block. With the fabric inside out, sew up the seam or seams on the sides of the sock, rounding the toe. The sleeves usually make a shorter pair of socks.

Make your seams thin, and go over it twice with a small stitch to reinforce the seam, or if you have a machine that reinforces edges, use the appropriate stitch.

And voila! Great winter socks.