
We did have our first major frost on September 9th, dawn broke to a dusting of fine white frost over the garden and fields. But we were prepared, and had covered the tender crops: peppers, tomatoes, ground cherries, a late basil crop, and even a pair of flowering fennel plants, hoping for some fennel seed. The frost spelled the end for the winter squash, pumpkin and cucumber vines, but the zucchini bushes showed real vigor, only burning the tallest leaves and not damaging the crown or small fruits. The last bean crop was also frosted, so we harvested the last of the green beans, and have been feasting on them, getting our fill of the fresh crop knowing it will be canned or fermented from now on.
The frost also marked the end of our market garden crops, which is more of a relief than a disappointment, we did as well as we could this year, and it is good to be able to focus all of our energies on our own harvest and winter preparation.
The bulk of our tomatoes, tomatillos and ground cherries are just ripening now, so we will keep them protected from frost for another 3-4 weeks before bringing in the remaining green fruits to ripen indoors. So my tomato sauce, salsa and chutney canning fest has begun. I'm also drying some ground cherries, they make nice little "raisins" for baked goods, with that unique pineapple flavor.
 The sunflowers have indeed bloomed in time to make seeds, I always forget how frost hardy they are. We are going to experiment with de-hulling the seeds this fall/winter.
 My own accidental hybrid "Sweet Curry" kabocha type winter squash, ripening in the dappled shade of the frosted vines. These will have to be brought in before the next frost, without the sheltering umbrella of leaves, the squash fruits would be damaged by a frost.
 The popcorn is ready to harvest, the kernels mostly dried on the cob. I husk them right away, then store them in a large onion bag and let them continue drying for a few weeks before shelling the cobs.
 A late summer fruit, Wild Raisins are ripening. They have a date-like flavor, but also like dates, have an unfortunate pit. My favorite way of making use of these delicious and abundant fruits is to put them through a food mill raw, and dry them as a fruit leather, they need no sugar this way. The pulp is also good added to applesauce, making an interesting applesauce variation.
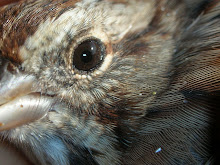
 Of course, the local songbird population is also fond of these sweet fruits. This female Common Yellowthroat, of the wood warbler family, foraged in the same bush.
 I got this lucky shot some time later.
 I try to keep a profusion of late summer and fall flowers available for the insects. These flowering lettuce bushes would normally be a part of my seed saving regime, but we are going to start over with regionally appropriate seed varieties in our next garden, somewhere on the West coast, so these flowers are just for the bees. The last pollen producing flowers in the garden are the hardy broccoli flowers, I always leave the small side shoots to go to flower, they continue to bloom and attract bumble bees even after the ground starts to freeze, well into November, even early December.
 A fennel flower, on it's way to seed, I hope. I started these fennel plants in March this year, determined to get some fennel seed from these slow-pokes, we'll see.
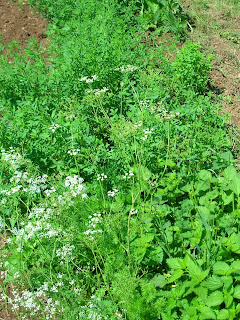
 The last of the Coriander flowers, my absolute favorite flower in the garden, they make a delicate bouquet all of their own.
It's amazing that they become such homely clusters, which is likewise, one of my favorite spices. We're curry-aholics, and if you've never tried coriander in baked goods, replace it with cinnamon in a spiced cookie recipe for a nice delight.
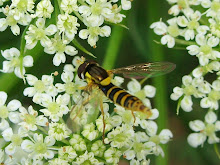
 Syriphid Fly eating the nectar of a Calendula Flower.
 Northern Leopard Frog, Rana Pipiens, this wet and soggy summer has been great for the frogs, never seen so many frogs and toads in the garden. Even found a young Wood Frog in the Zucchini. Plenty of bugs and slugs for them to eat this year.
 Syriphid Fly tasting a Red Clover blossom. It's a great year for these Syriphid Flies too, there's dozens in the garden, the larva are predatious, often of aphids and other small soft bodied insects, but the adults are pure nectar eaters. And red clover is one sweet source of nectar. I use it as a natural sweetener in herbal teas.


 We have potato flowers in varying shades from white to pink to lavender to blue, depending on the variety and corresponding with the color of the potato skin. As soon as these flowers begin to die back, I can begin to excavate some of the treasure trove beneath.
 Pea flowers are short lived and delicate creatures. This time of year, the pods seem to grow by inches straight out of the newly opened blossoms.
 Bean flowers remind me of orchids, perhaps the homely cousin, but beautiful still. And they continue to flower as young bean pods form, promising a reliable harvest, enough to put away for winter.
  Pumpkin and squash flowers glow like lanterns in the bare spring garden, and not surprisingly, they never fail to attract interesting insects for nectar, prey or shelter.
 And some vegetable flower are only ever seen in the seed saving garden. This globe of tiny onion flowers is wrapped in paper like the bulb below.

 Putting physical barriers, such as tin-foil or paper collars, around transplants is a common method of
  The morning after we put up the cutworm fence, we were happy to discover very little damage overnight. The herbs were untouched, and only a few carrot and parsnip leaves had been cut, exposing the location of the remaining cutworms. Thank goodness, it seems that my war with the cutworms is drawing to an end. Practicing organic and ecological gardening means out-smarting, and out-maneuvering pests and diseases. I tend to be of the disposition to lock horns and butt heads directly with my pest-sized opponent, but this time it was simply wearing me down. So I learned an important lesson in gardening: to be nimble and adaptable in technique and method, to use my intellect instead of sheer determination and will-power. Determination got me through the steep beginner's learning curve, but now that I've got a few seasons under my belt, it's time to sharpen my tools and think like a gardener!
 Other-where's in the garden, the perennial herb garden is flourishing, providing my first cut of Oregano, Thyme, Catnip and Alfalfa to dry for winter use.
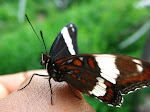
 and a Monarch look-a-like: the Eastern Viceroy.


 In the lower garden, our green beans and baking beans, as well as our dry peas and shelling peas. As well as a row of Naked Seeded Pumpkins between the peas. We got a few inches of rain this week, warm nights, and a hot sunny day today, so everything is growing by inches.
 Next to them, the brassicas and ground cherries. The Flea Beetles never did make it down to the transplants, after giving my turnips and radishes a hard time. And now I can hardly find a Flea Beetle in the garden, I'm pretty sure the Soldier Beetles finished them off, their population exploded around the time the Flea Beetles' declined. The cutworms were beginning damage some of the brassicas, so we stuck small nails along side the stems to prevent them cutting the entire stem off, they still climb up and take a leaf here and there, but we scout these areas too, and dig them up.
 Hungarian Hot Wax and Carmen Peppers just starting to flower. We spike them with nails as well, to prevent any cutworm damage. We've been babying these peppers along for nearly 4 months now, I don't think I could stand to see one of them toppled.

 The north hay field, which is not grazed, is primarily Timothy grass. The Clovers don't compete well in this field because it is low-lying and floods in the spring melt. Goldenrod is invading, and slowly out-competing the Timothy, and this field will need to be turned and re-sown to completely revitalize it. When our weather window broke this year, the Timothy was in the early heading stages. Actually the animals pick the Timothy heads out of the hay, the seeds would be high in protein. But there is still a high percentage of leaf compared to stalk in this early heading stage. About 20% of this field is scattered with clover, dandelion and vetch, making it a decent hay, but not high enough in protein to carry a lactating animal or weanlings.


.JPG)


