Good planning, preparation and preventative measures are the best insurance of good health and success in the garden and in the barn. But, especially in the first years when the learning curve is steep, things do go wrong and disease, pests or parasites can spread quickly and reach a critical level surprisingly fast. The ability to assess the symptoms and diagnose the problem is crucial to being able to react within time to save the crop, flock or herd.
So what elements are necessary to being able to diagnose a problem or illness, especially when encountering it for the first time? An observant and knowledgeable gardener or animal husbander is generally the most qualified to diagnose a problem because that individual knows the history of the soil or animal, and is familiar with the expected state of health in her garden or herd. The subtle first symptoms of dis-ease provide the best opportunity to address a developing issue before it gets out of hand. In the garden, these symptoms will include discoloration, spots, holes, wilt, etc, and usually accompany a period of stress, including temperature extremes, dry soil, wet soil, mineral deficiency or other soil imbalance. With animals the first symptoms include lack of appetite, listlessness, dull eyes or coat, runny nose or eyes, change in stool consistency, drop in production, etc, and again usually accompany an external stressor such as change in diet, transportation or change of location within the farm (i.e. barn to pasture), temperature extremes, exposure, lack of access to fresh, clean water, isolation from the herd/flock, or introduction of un-quarantined animal to herd/flock. As with our own health, stress decreases immunity to disease or infestation.
When I observe one of these primary symptoms, my first priority is to apply a first-aid measure where appropriate, to relieve the immediate stress. These responses can range anywhere from watering a wilting crop to giving an animal a homeopathic treatment for fever. (Remember to take notes of the treatments you give, the quantity and the time applied so that you can assess the responses to treatments, and more importantly, repeat your successes in the future.) Once I have contained the situation as best as possible, and this may include removing diseased plants from the garden or isolating an animal from the herd/flock, I then begin to investigate the originating cause of these symptoms. This is where observation, knowledge and health records are put to the test. If you are an absolute novice then you will be particularly dependent on books, forums, websites and more experienced individuals to help you diagnose the problem, but every one of these situations is an opportunity to increase your knowledge, so pay attention and keep records.
Begin by making notes, in detail, of anything you notice as "out of the ordinary", and use all of your senses. In the garden this will mean noting not only the condition of the crop/plant, but also the condition of the soil, the condition of surrounding plants (including weeds), any insects you see in close proximity to the affected crop (don't forget to look at the insects at ground level or just below the soil), even a nearby soil disturbance can be a clue. I find a digital camera useful in identifying diseases or pests in the garden. In the herd or flock, these kinds of observations can be somewhat subjective, and not nearly as obvious. But from daily interaction with domestic animals you get to know each individual's particular habits, appetites and behaviors. An animal who usually meets you at the gate, but stays in the barn that morning, is not feeling well. When an animal lays down more than usual, or doesn't eat or drink quite as much or as readily, or doesn't vocalize as much as usual, or stays a bit apart from the other animals, that animal is more than likely showing primary symptoms of illness. The more obvious symptoms will include quantifiable differences in temperature, bodily fluids, discharges, loss of hair, skin eruptions, or drop in production levels. Again, use all of your senses, listen, smell, feel and watch (well, maybe not taste!), and take notes or pictures. And be sure to look for anything out of the ordinary in the yard, pasture or barn, anything the animal may have eaten or been exposed to.
Now that you have all of this observational data, it's time to hit the books, forums, your own records, or experienced individuals who are familiar with your own bio-regional conditions. Sometimes the cause of disease or infestation is obvious, and sometimes it takes a bit of investigation. More often than not, the problem is compound, not just a simple or primary cause, so I will give a few examples of conditions we have experienced this spring, one in the garden and one in the herd.
I chose this example, of diagnosing a problem in the garden, because it begins with generic symptoms that could point to any number of causes, and shows our process of elimination to reveal the root causes of the issue. About a week ago we noticed that our bush beans were a bit discolored. There was some yellowing along the veins of the leaf, and around the edges, and a few speckles of brown that we recognized as insect damage (which would be a secondary symptom, the insects being attracted to the plants sending out chemical signals of stress). The plants had slowed their growth, but were not wilting, curling or browning. This kind of discoloring usually points to a few possibilities: mineral deficiency (perhaps as result of pH imbalance), or some kind of leaf burn (UV, chemical, acid rain, frost). We could rule out a chemical burn and frost, but suspected acid rain and/or UV burn. We are in an area that receives a lot of acid rain, and we have been noticing more frequent warnings of high UVs in the weather forecasts. Three days prior to the appearance of the discolored bean leaves, we had a sunny day that rated 8 on the UV index, followed by two days of rain. After this, the beans did not look so good. There's not much we can do to protect against UV damage, but like a frost, if the plants survived the burn, they would recover. And we already do what we can to prevent over-acidification in our soil due to acid rain by applying limestone and adding humus. Calcium is also necessary for the soil to be able to maintain a neutral pH, and to prevent the soil nutrients from becoming chemically locked up as happens in acidic soil.

It seemed clear to us that our bean crop was suffering from a mineral deficiency, but the cause was still unclear. A mineral deficiency can be a problem inherent in the soil, meaning that a mineral is actually missing. Certain crops are more susceptible to certain deficiencies, but most likely, other legume crops would show similar symptoms, and the peas were unaffected. Or it can be a result of a pH imbalance, essentially making necessary minerals inaccessible to the plants. Or it can be a problem of the plant's metabolism, not being able to absorb the minerals in the soil, due to stressors such as temperature extremes or wet/dry soil. So besides the possible causes of UV burn and acid rain, (both of which, beans are sensitive to) we had also been experiencing a cool spring with overnight temperatures remaining below 10C (50F). Tropical plants like beans do not grow/metabolize below this temperature, so it could also be possible that the plants are simply too cold. But more than likely, the true cause is a combination of these factors.

As we watched the crop over the next few days, we also watched for similar signs in nearby crops, and other legumes. None appeared, and a section of the bean crop started to recover. We had put a hay-bale wind break around our transplanted tomatoes and peppers, as it had been cool. The row of beans on the other side of this wind break were looking green and beginning to grow again, before the rest of the crop. This was a sure sign that the cool overnight temperatures had played a major role in the slowed growth and discoloration of our bush beans. And as the temperatures finally begin to warm, the rest of the crop shows signs of recovery. Had we not taken the precautions of protecting our soil from acidification, a simple stressor such as cool nights could have been compounded, possibly causing a crop failure. This is why it is so important not to spare your efforts in keeping your soil healthy and balanced, much like your own immune system, so that your crops will be able to withstand the inevitable environmental stressors that occur throughout the growing season.
Again, I will choose an example of diagnosing a problem in the herd that is difficult to diagnose because of the vague symptoms and the range of possibilities they point to. Our goat herd consists of one milking doe, one meat doe (not lactating or pregnant), and two bucklings. Each of these animals has different dietary requirements, the lactating doe requiring the highest amount and quality of proteins and minerals, the bucklings requiring moderate levels to support growth, and the meat doe requiring the least, but a sufficient amount to put on weight. Likewise, our milking doe will be the animal in the herd to show signs of illness first, the bucklings second, and the meat doe being the most resistant because of the fewer demands placed on her system.
When spring broke and the goats were out on pasture, our milker started to put on more condition and began also to increase her production of milk. The whole herd showed signs of vigor and health, frisking about in the pasture. One fine spring day, while out in the garden, I watched Juniper (the meat doe), bleat and gallop, three-legged, back to the barn. She held up one of her hind legs as if it had been injured. Of course, the rest of the herd followed her in. I followed to the barn to investigate, but could not find anything wrong with her leg or foot, and she was walking just fine. Then I heard it, the drone of a Horsefly. Juniper heard it too, and again, raced for the barn. She had apparently been bit by one of these inch-and-a-half long prehistoric nightmares (which, by the way, may have been one of the contributing factors to the extinction of the dinosaurs). They take a pretty good chunk out, and it does hurt.
Penelope, who had already been spending more time in the barn to escape the blackflies and the mosquitoes, simply went on strike. She would not graze, at least not much, and not in the daytime. I assumed that she would be grazing at night, as this is what the horse and our milk cow always did. But she began to loose some of that condition, and dropped back down in milk production. So we cut some tree branches and picked buckets of raspberry leaves and evening primrose, some of her favorites that are not available in the pasture. She wasn't picking up, but she wasn't getting poorer, for two days. Then on the morning of the third day, she looked absolutely hollow, had not eaten any of the hay or forages brought into the barn, and her milk was nearly half of normal. She was listless, lethargic, breathing faster, stools were firmer and pelleted (instead of the normal softer stool of lactating animals on pasture), she was laying down in the sun, and had no appetite for grains or her favorite treats of raspberry leaves. Her lack of appetite, and absence of chewing cud told me that a good first-aid response would be to give her a homeopathic treatment for colic (it has a blend of a few ingredients used in digestive disorders). And to make sure that she has enough liquids, as dehydration would compound the issue. She responded well to a mixture of warm water, molasses and apple cider vinegar, about a tablespoon of molasses and 2 tablespoons cider vinegar for every Quart of water. I gave her as much as she would drink.
Next I hit the books, most useful to me are my homeopathic veterinary books. They give very good clinical descriptions of the illness and help me to accurately diagnose. Her symptoms matched up well with simple indigestion. Rapid breathing, sub-normal temperature (hence laying down in the sun on a hot day, when normally she would be laying in the shade), lack of appetite, listless, and the rumen would feel doughy and be inactive. I went back to the barn, and felt her rumen. It was indeed doughy, feeling like an under-kneeded ball of dough that does not spring back. There was no accumulation of gas, or tympany, which would make the rumen distended and sound hollow like a drum. This was at least good. Simple Indigestion, untreated, can compound into Acute Indigestion with toxemia (blood poisoning), or Bloat. I now had two priorities, to get Penelope's digestion working properly again, and to figure out what caused the indigestion so as not to repeat the conditions.
I felt the rumens in the rest of the herd, each feeling slightly doughy, but still somewhat active (meaning noticeable rumbling and movement in the digestive system). We watched them closely, and noticed one of the bucklings laying down, often in the sun, the next day. At noon, he was laying with his head on the ground, not a good sign. We got him up, gave him a half dose of the Colic remedy, and as much molasses, apple cider vinegar water as he would drink. He too responded well, but we were at the tipping point. If we did not get on top of this, it could easily develop into a critical stage and as I've learned from watching a healthy cow go down with milk fever, animals can deteriorate rapidly.
Penelope's appetite had responded to the treatments we gave her as a first-aid response, so we made sure she had high quality forages in front of her, in the barn, at all times. She was still on strike as to going out in the pasture, terrified by every buzzing insect (granted, she had a huge welt on one teat where a horsefly had bitten her, nasty buggers!). We scythed pasture, brambles, comfrey and primrose, and fed her in the manger. And kept up the molasses and apple cider vinegar. But we were also cautious as to what we fed her, as to avoid compounding the indigestion into bloat. Rich pastures heavy in clover can cause bloat, so we scythed mostly grassy pasture. And we were suspicious of the tree leaves, causing the indigestion. Earlier this spring, we had given them plenty of poplar, and some maple, but brought down some birch leaves on the day the horseflies came out. Was there something in the birch leaves, or something in young spring birch leaves, that is indigestible? Or was it the fact that they ate too many of the birch leaves, prefering the convenience of eating them, over going out on pasture amongst the bugs, therefore getting a high concentration of a chemical or toxin in the birch leaves, that would otherwise be harmless in small amounts?
This seemed to us the most likely cause of indigestion. So our next trip to the Internet Access Center included a session researching the toxicity of birch leaves, and indeed, there is a concentration of phenolic compounds in winter growth. These phenolic compounds have been found to depress or inhibit digestion in ruminants.
See study here.It is important to watch for signs of recovery in sick animals, if they are not responding to treatments, do not simply wait and hope they will get better eventually. If they do not respond, then most likely, the problem is not diagnosed properly, or the treatment is not being applied at the right level and frequency. Both Penelope and the buckling showed a quick response to treatments. Every dose of molasses, and apple cider vinegar, would stimulate their appetite, readily taking mouthfuls of forages instead of nibbling and nudging at the feed. The buckling's rumen was back to normal the next day, and he was resting in a cool corner of the barn at noon, chewing his cud. Penelope took a few days to recover, but each day looked less hollow, more active, had a more active appetite and rumen, and began to recover her milk production as well. On the third day since the illness she went out for a bit of a graze on the pasture, and a strong morning breeze blew the bugs away long enough for her to get a belly full. Now, a week since, the herd is back on pasture, but we still bring buckets of pasture, primrose and raspberry when the bugs are particularly thick, to the point of harassing the herd. Penelope is back up to a normal level of milk production, and putting condition back on. And we are keeping young birch leaves out of reach from now on.
It is much easier to research an appropriate treatment for a problem in the garden or the herd/flock once you understand the cause, or at the very least, can identify the symptoms. With these clues and bits of observation you can begin to diagnose the problem. Many remedies and treatments are easy to find and easy to apply, and most conditions, if not all, can be prevented in some measure. Do not neglect to research the preventative measure to avoid repeating the conditions in the future. But if you suspect or have identified a virulent pathogen or disease in your garden or herd/flock, do not hesitate to contact a professional (farmer, vet, agronomist), and maintain good hygiene to prevent spreading the disease.

 Putting physical barriers, such as tin-foil or paper collars, around transplants is a common method of controlling cutworm damage. As immature larvae, especially in large numbers, the cutworms prefer small emerging seedlings, the kinds of row crops usually directly seeded into the garden. As the cutworms grow larger, they correspondingly prefer larger stems, including transplants which can easily be protected with collars or other physical barriers such as toothpicks or small nails stuck into the soil next to the stem.
 The morning after we put up the cutworm fence, we were happy to discover very little damage overnight. The herbs were untouched, and only a few carrot and parsnip leaves had been cut, exposing the location of the remaining cutworms. Thank goodness, it seems that my war with the cutworms is drawing to an end. Practicing organic and ecological gardening means out-smarting, and out-maneuvering pests and diseases. I tend to be of the disposition to lock horns and butt heads directly with my pest-sized opponent, but this time it was simply wearing me down. So I learned an important lesson in gardening: to be nimble and adaptable in technique and method, to use my intellect instead of sheer determination and will-power. Determination got me through the steep beginner's learning curve, but now that I've got a few seasons under my belt, it's time to sharpen my tools and think like a gardener!
 Other-where's in the garden, the perennial herb garden is flourishing, providing my first cut of Oregano, Thyme, Catnip and Alfalfa to dry for winter use.
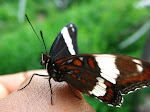
 We are also welcoming the butterflies back to the North. Including this White Admiral,
 and a Monarch look-a-like: the Eastern Viceroy.


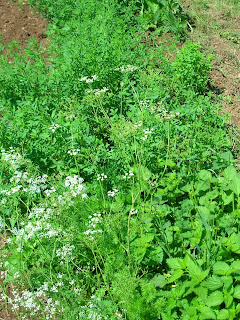


 In the lower garden, our green beans and baking beans, as well as our dry peas and shelling peas. As well as a row of Naked Seeded Pumpkins between the peas. We got a few inches of rain this week, warm nights, and a hot sunny day today, so everything is growing by inches.
 Next to them, the brassicas and ground cherries. The Flea Beetles never did make it down to the transplants, after giving my turnips and radishes a hard time. And now I can hardly find a Flea Beetle in the garden, I'm pretty sure the Soldier Beetles finished them off, their population exploded around the time the Flea Beetles' declined. The cutworms were beginning damage some of the brassicas, so we stuck small nails along side the stems to prevent them cutting the entire stem off, they still climb up and take a leaf here and there, but we scout these areas too, and dig them up.
 Hungarian Hot Wax and Carmen Peppers just starting to flower. We spike them with nails as well, to prevent any cutworm damage. We've been babying these peppers along for nearly 4 months now, I don't think I could stand to see one of them toppled.


 The north hay field, which is not grazed, is primarily Timothy grass. The Clovers don't compete well in this field because it is low-lying and floods in the spring melt. Goldenrod is invading, and slowly out-competing the Timothy, and this field will need to be turned and re-sown to completely revitalize it. When our weather window broke this year, the Timothy was in the early heading stages. Actually the animals pick the Timothy heads out of the hay, the seeds would be high in protein. But there is still a high percentage of leaf compared to stalk in this early heading stage. About 20% of this field is scattered with clover, dandelion and vetch, making it a decent hay, but not high enough in protein to carry a lactating animal or weanlings.


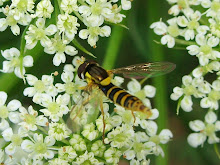
 I'm not the only one searching out the Cutworms. Fortunately we have most of the natural enemies of the Cutworm in the garden this spring.
 Ground Beetles provide a similar service as the Soldier Beetles, but they are less conspicuous and often go unnoticed.


.JPG)